DIY Growing New Plants From Rooted Cuttings
How to Propagate Shrubs by Cuttings
Fill up your landscape and share your favorite plants with friends using this simple plant propagation technique.
Growing new plants from rooted cuttings is a thrifty, low tech way to fill up landscape beds without spending hundreds of dollars at the nursery. Gardeners have done it for thousands of years. It’s also a great way to share heirloom plants with friends and family.
The most popular types of plants to grow from cuttings are shrubs. Heirloom roses, hydrangeas and camellias have been passed from generation to generation via cuttings. Many entrepreneurs have employed the technique to start lucrative nursery businesses. Propagating shrubs by cuttings is pretty easy to do if you follow these simple steps.
Get permission before collecting cuttings.
If the plants are growing in your yard and you want to plant the newly propagated babies in your yard, go for it. Always get permission to take cuttings anywhere else. New plant varieties are patent protected against unauthorized propagation for twenty years, so stick to the classics.
Take cuttings at the right time of year.
Cuttings must be taken from the current year’s growth. Cuttings are classified as “hardwood” or “softwood”. Softwood is green, flexible new growth that is still in an immature state early in the growing season. Hardwood is mature and rigid at the end of the growing season or in dormancy.
Take softwood cuttings in spring or early summer from the season’s new growth, while the stems are still green and flexible. Softwood cuttings are somewhat fragile and wilt easily, but root quickly.
Take hardwood cuttings just after leaf drop in fall or just before budburst in late winter or very early spring. The stems of the current year’s growth will have turned brown and rigid by this time. Hardwood cuttings are far less delicate than softwood, but take a much longer time to root out.
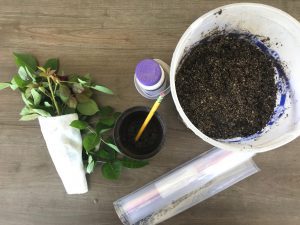
Prepare the cuttings and rooting medium.
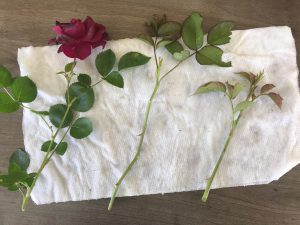
Taking stem cuttings of either hardwood or softwood, the process is similar. Cut 4 to 6 inch long sections from healthy stems. Keep the cuttings cool and moist by wrapping them loosely in a wet paper towel until you are ready to stick them into the rooting medium. To hedge against losses, it is helpful to take a few more cuttings than you think you’ll need. You can always give away extra plants.
Some plants easily root in water, but many do not. Using a rooting medium (like potting mix, peat moss, perlite, vermiculite, or sand) is more universally successful for a wide range of plants. Use 4 inch nursery pots, recycled plastic containers of a similar size, shallow window boxes, whatever fits your growing space. Fill your container(s) with pre-moistened rooting medium.
With a sharp knife, cut the stem of each cutting just below a leaf node (where a leaf connects to the stem). Remove the lower leaves, keeping only the last two leaves at the tip of each cutting. Flowers, flower buds and seed heads should also be removed.
Stick the cuttings.
Use a pencil to make 3 inch deep holes in the rooting medium to receive the cuttings. Dip and swish each cutting into the rooting hormone so the bottom 1.5 inches of each cutting is well coated. Insert the cuttings into the premade holes, being careful not to rub off the rooting hormone.
Gently use your finger to firm the rooting medium around each cutting. Water sparingly. Cover cutting containers with plastic to maintain high humidity. An easy way to accomplish this with small containers is by placing them inside plastic bags and closing them securely. Place them in a location with bright, indirect light.
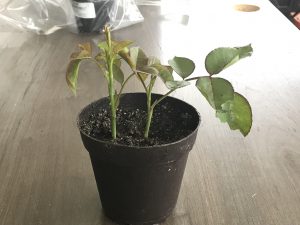
Care for the cuttings until roots develop.
Open the bags weekly to allow air exchange, check for root development, and monitor the moisture in the rooting medium. For most softwood cuttings roots develop in 3 to 8 weeks. Hardwood cuttings may take longer.
At the first sign of root development, begin to harden off the cuttings by gradually exposing them to normal growing conditions. Leave the bag open for an hour or so for a couple of days in a row. Then leave it open all day and close it at night. Remove the plastic after a week of hardening off.
Plant the new shrubs in your landscape.
Transplant the rooted cuttings to gallon size containers with potting mix. Gradually transition them to natural light (full sun for full sun plants, shade for shade plants, etc.) and temperatures. Plant the new young shrubs in your garden beds in mild weather of early fall or early spring.
Most shrubs can be easily propagated by rooted cuttings. This is a fun gardening skill that anyone can learn to build a beautiful landscape.
You must be logged in to post a comment.